|
|
 |
||||||||
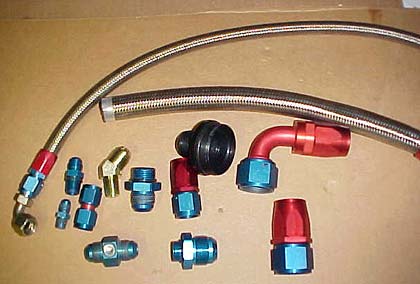
If you are making braided lines for the first time or have struggled in the past, I have a few tips that seem to make it easier for me. First, buy matching brands of hose and fittings. I have always used Aeroquip and never had a problem. Second, when I am ready to cut the hose to length I always wrap it TIGHTLY with 3M filament strapping tape right where I plan to cut. You can use a hacksaw with a fine (24 teeth per inch) blade and it will work well. If you have a cut-off saw (lucky you) they work really great. Remove the tape and trim any small loose wires with a sharp side cutter. Third, I make a set of aluminum vise jaw liners to protect the fittings from damage during assembly. Clamp the collar piece of the fitting in the vise with the aluminum saw protectors installed and work the hose into it with a clockwise twist as you apply pressure. Be sure there are no little pieces of wire snagging the collar as you slip in it. Fourth, when the hose is in all the way I tear off a piece of masking tape and wrap it just below the collar. This will allow you to see if the hose is slipping out of the collar as the fitting is assembled. I always spray the shaft of the fitting that goes into the hose and collar with WD-40 to make sure it threads together without binding or galling the threads. Should thread into place with no problems other than your vise needs to be mounted to a sturdy bench. The threaded end of the fitting should end up about with about 1/8" of a gap between the collar and the swivel part of the fitting. I hope it helps if you have struggled in the past with braided hose assembly. A couple other changes had to be made with this switch in fuels. I called Gary at Number One Stop Products, told him what I was doing and asked if I needed any changes to the throttle stop. He said I needed a modification to the throttle stop blades. Through the years he has designed a series of special sized slots that he cuts in the blades to prevent the alcohol from "standing" on the blades when the throttle stop is closed by the timer. This occurs because the alcohol carburetors are sending so much fuel into the engine. He told me the modifications would take care of it. I also changed the amount of timing retard for engine starting I
have set in the MSD Programmable 7 ignition. I used 20 degrees on
gas but MSD suggested moving that up to10 degrees with alcohol because
of the slower burning properties of alcohol. With the programmable
ignition it may take a little trial and error but it will not be a
problem finding the "sweet spot." |
|
||||||||
|
Copyright 1999-2002, Drag Racing Online and Racing Net Source |
|
||||||||