
It Ain't Rocket Science, Part II: I Learn About Power-Glides and So Can You!

2/8/06
![]() t has been an interesting month since my last article “It Ain’t Rocket Science”. Not only have we freshened three more transmissions, I received dozens of emails about “little details” I could and maybe should have mentioned in the first article. But, here is the deal. This article is not intended to be a “technical manual” on how to build a Power glide. It is just a tech story showing how I am doing it with the help of Carl Munroe’s “Power glide Handbook” and some friends.
t has been an interesting month since my last article “It Ain’t Rocket Science”. Not only have we freshened three more transmissions, I received dozens of emails about “little details” I could and maybe should have mentioned in the first article. But, here is the deal. This article is not intended to be a “technical manual” on how to build a Power glide. It is just a tech story showing how I am doing it with the help of Carl Munroe’s “Power glide Handbook” and some friends.
This month’s article will deal with preparing the reverse piston and clutch pack clearance,
Finding the right high-gear clutch pack clearances, getting the small parts in correctly and final assembly tips I use.
The one consistent thing I have seen in the transmissions I have disassembled is the “inconsistency” in the modifications they have. Holes drilled in different locations in the cases, some holes tapped and plugged, others opened up, etc, etc. I think these different modifications are from the instructions for the particular valve-body in that transmission. I am not here to redesign anything so if the customer was happy with the function of the valve body and is not looking to get faster reaction times from a double-dump brake I have no problem with using whatever valve body was in the transmission when it came into the shop. Clean it up, put a fresh 200-210 lb. Pressure Regular spring in it as a cost effective way to assure good pressure within the transmission, and put it back together. Stronger springs are available and I used the 230 lb. in my Top Dragster transmission for some additional operating pressure.
Let’s start with Reverse.
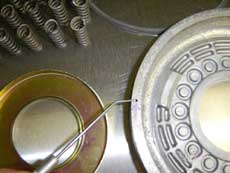 |
| This is where I drill the vent hole in the reverse piston. Make sure you drill it so it will not hit the groove for the seal. This allows trapped air and aerated trans fluid out from behind the piston so it can apply faster and more consistently. |
In particular, the reverse piston. I will assume you got it removed and have inspected it for cracks. I start by drilling a .090” vent hole in the outer edge of the piston to act as a vent to let air or aerated trans fluid a place to escape when reverse applied. It helps make for “cleaner” application and could help prevent some “rocking” when the transbrake is applied. It is a simple procedure; take your time and drill the hole slightly to the inside on the outer edge of the piston so you miss the groove for the seal. Note: If you drill the hole crooked and hit the opening where the seal goes you have to throw it away and get another reverse piston.
Next up is the reverse piston retaining plate and springs. Some Powerglides are over 30 years old and so are the reverse retaining plate and springs. My choice is to replace the retaining plate and springs with aftermarket heavy-duty units. They are available from different aftermarket suppliers, I use the Sonnax built ones. You will probably have to do some minor filing or grinding on the inside opening of the retainer plate to open it up so it will slide over the support in the back of the case. You need it to slide easily but not be sloppy.