|
<<
PREVIOUS PAGE

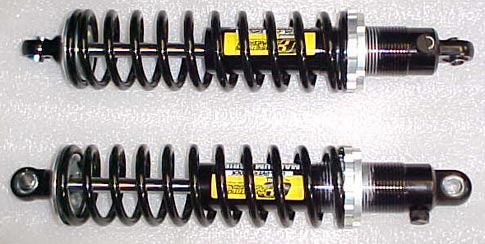
This is the assembled
Magnum Series shock with the spring installed.
The 12-position adjustment knob can be seen
on the right side of the shock absorber.
The Magnum Series shocks will give us 12 easy
adjustments and should allow us to be up and
racing right away with consistent launches.
We did a little guess work on the coil-over
springs, but went with Competition Engineering
C2555 (100 lb.) springs. We might be a little
too soft, but until the car is assembled and
we start testing I had to start somewhere. Don't
forget to get a coil-over shock adjusting tool;
without one changing the ride height and spring
pre-load is a real hassle. We got the Moroso
#62030 for $20.00. The shocks were easy to assemble
and fit perfectly.
The next project I had to get started on was
the WIRING. This can either be a fun project
or a nightmare. It basically boils down to your
attitude before you start and how well you planned
ahead. This was about the tenth car in recent
years I have totally re-wired. Your plan should
start at the batteries and go to the water pump
and include everything in between. Here are
some basic tips I would recommend.
- I DO NOT try to make my wiring look like
the ones you see on $100,000 magazine project
cars and even some race cars that were done
professionally. That type of wiring with the
tight wire looms and hundreds of harness clamps
and trick $60.00 plug-ins are just TOO MUCH
for me.
- I want simplicity so it is easy to repair
or change and economical so I can afford to
do it in the first place. I can afford a little
extra time long before I can afford a bunch
of $20.00 connectors and special tools that
are needed to install them. Besides, I can't
remember the last time the wiring on one of
my drag cars ever got soaking wet, so why
do I care if I have weatherproof connectors?
- Find a good supplier for different colors
of automotive wire. I use a GPT standard wire.
It has a PVC jacket and is the most common
wire available. There are a couple upgrades
from the PVC jacket if you choose to give
your car the "Cadillac treatment." There are
three types of wire that have a jacket that
is resistant to oil, grease and acids. They
are also designed for use in a higher temperature
environment. The SXL jacket is standard thickness
(like the GPT), the GXl is a thinner wall
jacket and the TXL is an extra thin jacket.
The conductor is the same the difference is
in the protective jacketing (insulation).
I use Waytek, Inc. for my wiring supplies.
Call them at 800-328-2724 to get a catalog
or go to their website (waytekwire.com) to
see what they have. They shipped me everything
I needed the next day and the order was complete.
They also have a great selection of crimping
tools and heat guns for the shrink tubing.
- I decided to use a readily available switch
panel for Back-2-Basics. I spent some time
looking at what was available and I chose
the Moroso #74180 because it had quality switches
with amount of circuits I needed and best
of all it comes with 20 amp circuit breakers
rather than fuses. It retails for about $125.00
and you would be hard-pressed to make a copy
of it for that price if you bought individual
components.
- One thing to keep in mind when you do the
switch panel wiring is a rule that is sometimes
overlooked by the car builder, and then some
"panic wiring" takes place when you won't
pass tech inspection. The power to your electric
fuel pump must come from the ignition switch.
Wire the power to the fuel pump switch from
the "on" position of the ignition switch.
That way when you turn the ignition off the
fuel pump also turns off. For me it means
one more thing I don't have to remember. I
leave the fuel pump switch "on" all day, but
it only runs when I turn the ignition on.
Nothing more embarrassing than pulling into
the waterbox and the car dies and after 10
seconds of panic you remember you forgot to
turn the fuel pump switch on. Been there,
done that.
NEXT
PAGE >>
|