| 
Time for a “Real Make-Over”
By Jok Nicholson
2/8/05
When we purchased the dragster to replace the
Vega project car we knew it was in need of a major makeover.
We did the wiring in a couple days last summer and some minor
repair to the ailing engine. We ended up getting a win, went
some rounds but the engine was too weak to be consistent.
That along with the fact I only have Mopar parts lying around
meant we needed an engine change.
Then the snow began to fall and it was time in Iowa for some
serious disassembly. We went for the whole deal. Stripped
the car to the bare frame. Spent about two hours looking at
every weld and we found nothing but a small crack in the bracket
where the left end of the midplate mount bolts on. Easy to
fix and then we sanded the frame by hand, primed it with a
sandable primer and then gave it the “ol’ spray
bomb special” paint job. Actually my 20 years around
body shops helped and I clear coated the cage so it looked
pretty good and should hold up well. The key is to take your
time and let the paint dry thoroughly between coats.
 |
 |
| Here is the bare Racecraft
Chassis 225” slip-joint chassis down to the bare
bones. We sanded it from here with 220 grit then 320 grit
before priming and painting it. |
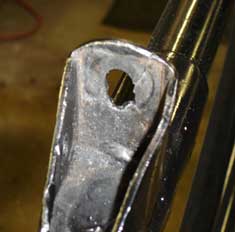
This is the only crack
or damage we found after a very thorough inspection. The
bolt hole for the left side of the mid-mount is cracked.
We are going to cut a piece of chromoly .090 plate and
tig it from the back side and then redrill the hole when
the midplate and engine go back in. |
Now it is assembly time and we started by spraying the floor
panels with trunk liner spray paint. Nice texture and it is
urethane so it will last. We made a new foot box front panel
as the old one had about 20 holes in it from the previous
owner.
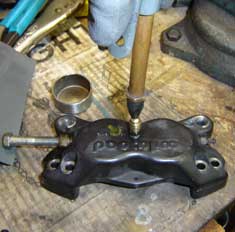
We rebuilt the Wilwood 7/8” master cylinder with an
$18.00 kit. We rebuilt the two rear brake calipers with Wilwood’s
“Square O-ring Kit” (does that sound as strange
to you as it did to me???). The wheel cylinders presented
a problem in getting them apart. The pistons would not budge.
It finally took about 150 p.s.i. of air shot into the brake
line fitting to blow them out. Now I think we know why the
brake pedal was so hard to push down to get the brakes to
work. They were corroded on the edges, but a little Scotchbrite
and now they slide like they should. The rear rotors were
in sad shape with deep grooves and some surface cracking.
I think they saw a few too many sets of metallic pads from
prior owners. One thing we noticed was the lack of lock washers
or safety wire on the rotor retaining bolts. All the brake
bolts should be safety wired as they get a lot of temperature
change and absorb all the vibrations. Here is a picture of
a set of safety wire pliers. You can get them through dozens
of different aircraft or high performance stores. I also use
red Loctite on all bolts throughout the chassis on reassembly.
(DRO note: For more information about safety wire, see
also our tech feature "Getting
Wired.")
 |
 |
| It took 150 p.s.i. to
get the pistons out of the calipers. Man, were they stuck.
As hard as the pedal pushed when we got the car I should
have checked them before now. New o-rings and a good cleaning
and they work like new. |
Here are the safety wire
pliers I bought from a mail-order aircraft supply company.
I think Moroso, Mr. Gasket, Powerhouse Tools, etc have
similar items available. |

|