|
|
|
|||||||||
El Camino Nitrouso
|
||||||||||
|
It seems like every car magazine has a project car of some sort. So the powers that be ( we have only your best interests in mind ) at Drag Racing Online figured that we should have one too. Unfortunately, the paper magazines have already laid claim to the neat project names and have scoured all of the junk yards — oops, I mean recycle yards — in Southern California and bought the really neat doorslammers that can be made into a street stormer for a mere pittance. So we here at DRO are taking the path less traveled. We have come to the conclusion that, unless you are the editor of a magazine or the owner of a speed shop, building a nice street and strip cruiser is not easy or cheap. In most cases, especially if you don’t have a couple of years to search for the parts and a fully equipped garage, it is going to cost the average guy or gal a good chunk of money or the equivalent to get their hot rod finished in a reasonable amount of time. The sad fact is that for most of us, building a hot rod means that we are going have to burn up favors, barter, or spend our cash. Those are the hard facts of life just learn to deal with them. OK, if you’re still with us let’s get on with DRO’s project car. After paying an Encino think tank a considerable retainer to develop a name they came up with what we think is a very unusual and catchy name. We will call this car the Wednesday Night Warrior. The names fits because what I wanted was to have a car I could take out to the local Wednesday test and tune and drive the crap out of. Actually, the plan is to do massive burnouts and then try to smoke the tires the entire quarter-mile on each lap without damaging anything except the tires and my ego. I also wanted a car that I could let anyone drive at the track without worrying about it hurting itself and it had to burn pump gas.
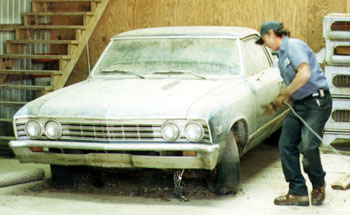
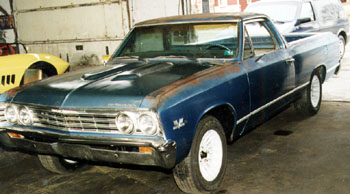
About a year and a half ago I found just such a car. DRO’s street guru Bill Weckman had a ’67 El Camino with 31,000 miles on it that hadn’t been licensed since 1985. It had a bench seat, a turbo-400, and a rat motor under the hood. I bought it from him and then had him rebuild the 402/396 that came with it. Everything in the motor is stock including the hydraulic cam. As part of the engine deal Bill had the turbo-400 freshened by the shop that does the transmissions for his own blown street ’Vette. Bill generously allowed me to make time payments on the car while keeping it at his shop, but I recently made the last payment and the El Camino will soon be under my foot. We (meaning mostly Bill Weckman) have done a lot of work on the El Camino since I bought it. My contribution usually means writing the check but occasionally Bill allows me to help just so long as I don’t screw up more than he can fix.
Once the engine was finished and installed between the rails there was one last bit of work to do. I wanted a little extra power under the hood just in case, so I called Pro Mod Wad at NOS and he recommended their Power Shot kit for big blocks. I didn’t pay cash for this item but I’m sure I owe Wady something to be determined at a later date. When it came time to do the installation old Jeffy actually did a lot of the work. In order to install the nitrous so that it was driver friendly and also put some belly clearance into the El Camino for the driver, we decided to install an aftermarket steering wheel. A trip to the local all night parts house secured a Grant steering wheel. Bill likes to put a button switch close to the drivers thumb so that the driver doesn’t have to take his hands off of the wheel when using the nitrous.
OK, with the wheel and switch installed and wired the next step was to install the NOS system itself which actually turned out to be incredibly simple and easy to do. It took about a half-hour to put the pieces of the kit together. Again, read the instructions and a minimal of tools are required.
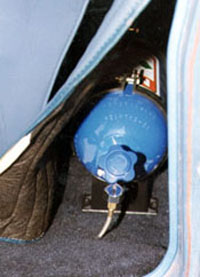
The next step was to install the bottle and route the nitrous line. After due consideration we decided to conceal the bottle and lines as much as possible.
If this whole installation sounds too easy, take heart dear reader — it is. In my opinion it is more difficult to put on an aftermarket steering wheel or headers or an intake manifold than a nitrous kit. And the best part is that for about $500-$600 bucks anybody can put a couple of hundred horsepower on their motor. Try making that kind of horsepower for that kind of money with any other aftermarket parts.
In the next installment of El Camino Nitrouso we will show you what we have done to the drivetrain in the way of wheels, tires, and suspension. We’ll also look at the headers, and exhaust system and if the weather allows we’ll go to the track with a group of Drag Racing Online miscreants and see how many sets of used, hard tires we can melt down with a portly Camino powered by a pump gas rat on nitrous. Remember kids, this is all about having fun at the drags which is what we intend to do.
photos by Jeff Burk
|
||||||||||
|
Copyright 1999, Drag Racing Online and Racing Net Source |
||||||||||
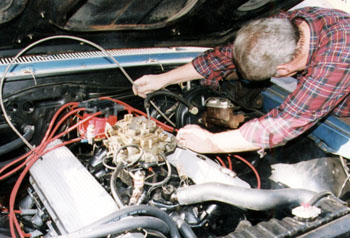
 The
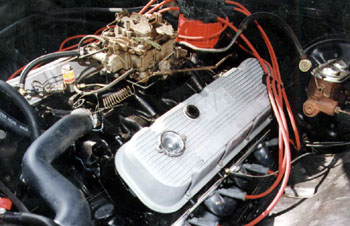
El Camino’s powerplant was the first thing that got massaged.
A 396/402 rat came with the body. Weckman opened it up and determined
that the engine was a low mileage deal. He then basically freshened
the engine by installing a set of stock rings and bearings since the
cylinders didn’t need boring and the crank only needed to be
polished. The heads got a competition valve job and new springs; otherwise
the engine is as stock as the day it was made. The pistons have a
little dome so we think the engine may be a 325hp model but we aren’t
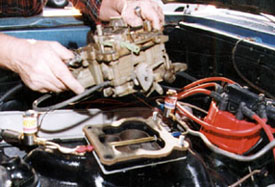
sure. (Any thoughts about this out there?) I found a quadrajet-style,
medium riser, cast iron intake for $40 at a swap meet. We bolted on
a pair of furnished Dynomax Jet Hot coated headers, plus an MSD HEI
distributor and wires. MSD gave me the distributor but I bartered
some photography to Bill for the wires.
The
El Camino’s powerplant was the first thing that got massaged.
A 396/402 rat came with the body. Weckman opened it up and determined
that the engine was a low mileage deal. He then basically freshened
the engine by installing a set of stock rings and bearings since the
cylinders didn’t need boring and the crank only needed to be
polished. The heads got a competition valve job and new springs; otherwise
the engine is as stock as the day it was made. The pistons have a
little dome so we think the engine may be a 325hp model but we aren’t
sure. (Any thoughts about this out there?) I found a quadrajet-style,
medium riser, cast iron intake for $40 at a swap meet. We bolted on
a pair of furnished Dynomax Jet Hot coated headers, plus an MSD HEI
distributor and wires. MSD gave me the distributor but I bartered
some photography to Bill for the wires. 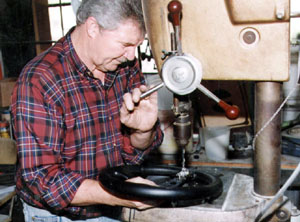 As
it turned out, replacing the stock steering wheel was the hardest
part of this project. A few less beverages and a little more attention
to the instructions would have made the installation less difficult
but a lot less entertaining. After the assembled group of on-lookers
quit laughing, Bill took the wheel out of my hands and finished the
job. All that is required to
As
it turned out, replacing the stock steering wheel was the hardest
part of this project. A few less beverages and a little more attention
to the instructions would have made the installation less difficult
but a lot less entertaining. After the assembled group of on-lookers
quit laughing, Bill took the wheel out of my hands and finished the
job. All that is required to 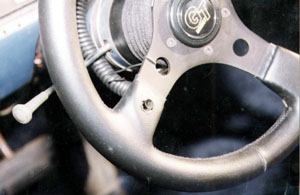 install
the Moroso switch onto the Grant wheel is about a half hour of your
time (or if you choose the optional Burk method about three hours
and a six pack of your favorite beverage). The same formula applies
to installing the Grant wheel.
install
the Moroso switch onto the Grant wheel is about a half hour of your
time (or if you choose the optional Burk method about three hours
and a six pack of your favorite beverage). The same formula applies
to installing the Grant wheel.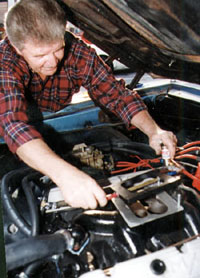
 All
that is left is to hook up your two wire harnesses to the solenoids
and to the se box under the dash, tighten the fittings on the carb,
make the electrical connections, tighten down the carb studs and hook
up the throttle linkage. You are now ready to cruise and crush.
All
that is left is to hook up your two wire harnesses to the solenoids
and to the se box under the dash, tighten the fittings on the carb,
make the electrical connections, tighten down the carb studs and hook
up the throttle linkage. You are now ready to cruise and crush.