|


I started out with fuel upgrades. I purchased
an OBX fuel pressure regulator, fuel rail and
a high flow fuel filter. These were all necessary
for upcoming performance upgrades, plus they
look cool. Then I upgraded the clutch to a
center force dual friction racing clutch and
the stock flywheel was changed to a clutch
masters lightweight design that only weighs
8 pounds and has a replaceable contact patch
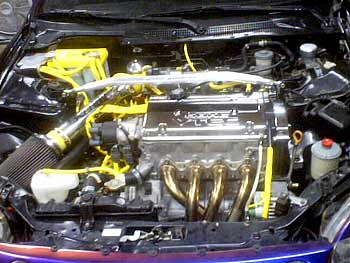
and starter teeth. I also went with an obx
stainless header, a 4-2-1 design, and got an
aluminum intake pipe and a K&N filter.
The axles were custom made by a company called
Raxles and they say their stage 2’s are
good and up to 400 hp and they look great.
Putting the motor in is not that bad. I separated
the H22 from the tranny and then took the hoist
and put it on the floor in the engine bay.
Then I bolted the transmission up to it and
installed the rear mount and transmission mount
because it’s a lot easier before it’s
in the car. There is a bolt on the transmission
mount that needs to be cut down to clear the
frame rail after this is done. Start to pull
the motor up into place once you have it in
the correct alignment. Put the bolts in the
mounts and bolt the driver’s side mount
on once the motor is secure. Then put the new
axles in along with the intermediate shaft
and start putting the suspension back together.
Take the shifter cables and hook them up to
the transmission, then start plugging up the
wiring into the main harness. Then run new
heater hoses. For the radiator hoses I used
the stock Prelude 92-95 pieces, the bottom
one fits fine, but I had cut down the top so
it would fit properly.
 After that I hooked up the fuel lines, vacuum
lines and hydraulic lines and installed the
crank pulley, the alternator and the belts.
Then I installed the starter. Once every thing
was hooked up I went back through to check
for anything missed and made sure all of the
bolts were tight. Then it was time to fill
the fluids and install the battery. I checked
thoroughly for fuel leaks. To do this just
turn the key on and the pump will run. You
might have to do that several times to get
the fuel to the rail. Once pressure has built
up and there are no leaks, go through and check
to make sure everything is hooked up properly
and nothing is loose in the engine compartment,
like tools, bolts, nuts, etc. If everything
is good to go and it was done properly it will
fire right up with no check engine light. After that I hooked up the fuel lines, vacuum
lines and hydraulic lines and installed the
crank pulley, the alternator and the belts.
Then I installed the starter. Once every thing
was hooked up I went back through to check
for anything missed and made sure all of the
bolts were tight. Then it was time to fill
the fluids and install the battery. I checked
thoroughly for fuel leaks. To do this just
turn the key on and the pump will run. You
might have to do that several times to get
the fuel to the rail. Once pressure has built
up and there are no leaks, go through and check
to make sure everything is hooked up properly
and nothing is loose in the engine compartment,
like tools, bolts, nuts, etc. If everything
is good to go and it was done properly it will
fire right up with no check engine light.
I would like to thank Ryan from umiperformance.com.
He gave me an awesome deal on a custom part
for the H22. I was very impressed with his
craftsmanship. The part he made for me is called
a helix boar throttle body spacer and yes,
they do make these for most applications, but
not for mine until now. This part is special
because I had him put a port in the back side
for a future upgrade, which will make a world
of difference. This part is made to improve
low-end throttle response and to spin the air
as it comes into the intake to help charge
the intake.
Success! The motor is running properly and
now it’s time to put it all back together.
After I got that done I went to my buddy Troy’s
shop, TJ Mufflers, and we put a nice 21/2 in.
custom exhaust on with a quiet free flow muffler
and a stock looking exhaust tip. This setup
is truly amazing; this car is very light and
fast. Unfortunately I have not had it to the
track yet to see what it actually runs. If
I had to guess I would say high 12s to low
13s on street tires, but we will see what it
turns in the NOPI event at gateway in July. 
|