|
|
 |
||||
|
|||||
|
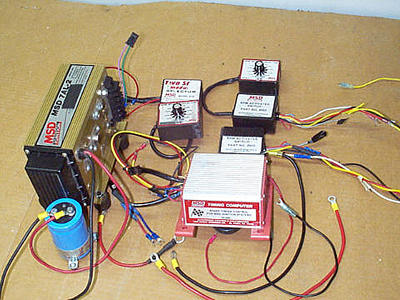
Here are the basic color codes: Red: This wire is responsible for turning the Digital-7 On and Off. Connects to a switched 12-volt power source. Orange and Black harness: Connects to supplied wire harness that goes to coil. Trigger wires: Violet and Green come in a harness for the magnetic pickup of distributor or crank trigger. Dark Blue: When 12 volts are applied this wire activates several features including; Launch RPM limit, Launch retard value, Launch Timing Curve and will reset Shift light sequence to first gear. I hooked this one to transbrake wire. Light Blue: This wire activates the Burnout RPM limit when 12 volts are applied. I hooked this wire to my line lock wire. Pink, Violet & Tan: activate first, second, and third stage of retards if you use them. I didn't. Yellow: Shift light activation wire. Supplies ground to activate a light. I hooked this one up to my dash mounted shift light. Brown/White: RPM Activation Switch. This wire will supply a ground to complete a circuit at a desired RPM. Will handle up to 3 amps. I hooked this to my C0-2 shifter solenoid. Fiber Optic Connection: This is where the fiber optic cable of the part number 7555 Inductive Sync Kit connects to take advantage of the Individual Cylinder Management feature. This was an easy item to install, as all you have to do is simply slide it over the number one plug wire and hook up the fiber optic cable. This feature lets you change the timing to an individual cylinder. When I get the engine on the dyno this winter I feel this feature will let me get Exhaust Gas Temperatures more consistent cylinder to cylinder for more power and consistency. The installation instructions provide checklists and detailed explanations of each feature. MSD also includes detailed drawings of different installations. One item they mention in the instructions is the Hand Held Programmer / Monitor part number 7550. This can be used in place of the laptop I used to set the different "values" I discuss later in this article. It is a neat piece of equipment and necessary if you do not have access to a laptop computer.
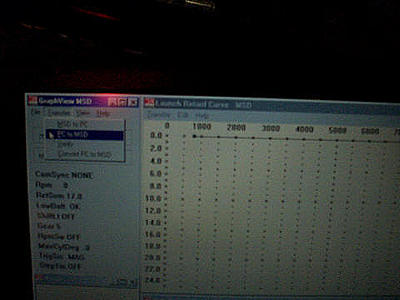
This is how the actual installation went for me: I did some planning on where the wires would be connected. I used an 8 position terminal strip to get everything in its place. After bolting the MSD Digital-7 into place I simply ran the colored wires to the corresponding accessory. Then I ran the coil wire harness out to the coil and then ran the magnetic pick-up wires to my old reliable MSD billet distributor. Be sure to separate these harnesses to prevent interference problems. They should run along the block or along the frame as these act as ground planes to prevent electrical interference. Keep them separated from spark plug wires where possible. It took about an hour to get everything hooked up and then the fun started. It was time to program the MSD Digital-7 Programmable Ignition Control. I got out the trusty Gateway laptop and using the MSD supplied 9-pin wiring harness, I installed the MSD Pro-Data+ Disk. The next step threw me for a few minutes but I caught on after a few tries. To download a program or upload a program from the Digital-7, the Ignition switch must be On. After I got that figured out it went really well. The MSD Graph View icon came up and when it is opened you can see every feature offered. A simple pull down list gives you a list of the options; launch RPM, burnout RPM, start retard desired, shifter RPM, shift light RPM, etc. Just pick the numbers you want to start with and "download" it to the MSD. If you run a couple different classes or brackets, you could make a program for each class. I set up a program for running 10.90 Super Street/Hot Rod that has higher start line RPM settings and higher shift points than my program for ET Brackets. There is no changing the settings at the track; just download the program you want into the MSD for that event.
|
|||||
|
|
|||||