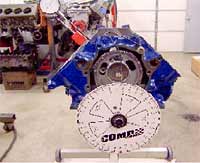
Here is the Comp
Cams degree wheel in action. The dial indicator
is set up on the intake lifter. Degreeing
in the cam is part of what sets apart the
engine assemblers from the PRO engine builders.
|

Now, a brief overview of the actual process
of degreeing in a cam. I am only going to explain
the duration at .050" lobe lift method. The
other method is to find the intake centerline
but I don't like that method, so there! Install
your timing set with everything on theoretical
"straight up". First, you have to have the proper
equipment for the job. You will need a dial
indicator and magnetic base, a degree wheel
such as the one from Comp Cams, a pointer (a
piece of 10 gauge wire and a bolt to fasten
it works fine) and a positive piston stop. The
stop can be a homemade plate with a stop bolt
or a "fancy" one like the piece I use from Powerhouse
Products. Second, fasten the degree wheel to
the snout of the crank with the number one piston
at approximately top center and position the
degree wheel "0" at the 12 o'clock position.
Now back down the piston about a half inch in
the bore (doesn't matter clockwise or counterclockwise)
and install the positive stop. The photos will
show this more clearly.

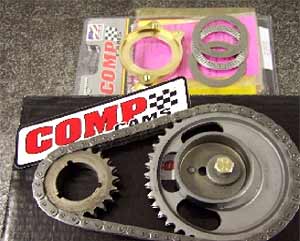
Here is the Comp
Cams Hex-a-just timing set and torrington
bearing camshaft retaining plate. They are
both top quality pieces and make my job
just a little easier. The retaining plate
replaces the factory plate with a bearing.
|
Then rotate the piston back up very gently
until it stops against the piston stop. Take
your attached pointer and line it up on some
even number such as 20 degrees. It doesn't matter
what number you line up on, it just makes it
easier to figure with even numbers. Place a
mark on the wheel at that point with a pen.
Then, rotate the piston back down to bottom
center and keep going until you once again come
up against the stop. Mark that position on the
wheel and add up the amount of degrees between
the two marks. Let's just say that it all worked
out perfect and both of your numbers were 20
degrees. One side is before top center and the
other is after top center. If you add the two
values you get 40 degrees total. Divide 40 by
half and you get 20. So, in this case your TRUE
top dead center would be on the 0-degree mark
on the wheel. Whatever the numbers are, add
them and divide by two. Then count back from
one of the marks the amount you came up with.
This is TDC.
Next, remove the piston stop and rotate the
crank until the new true TDC mark lines up with
the pointer. If the new TDC mark is for instance
5 degrees before TDC on the wheel, line that
up with the pointer. Then move the POINTER to
TDC "0" on the wheel. DO NOT move the wheel
to match the pointer. That would ruin all your
efforts. Now, we can get
ADVERTISEMENT
 |
crackin'!
Install the dial indicator assembly on the block
and line up the plunger with the #1 cylinder
INTAKE lifter. Zero the indicator and carefully
turn the engine clockwise (with a long handled
ratchet for leverage) until the lifter moves
the indicator to .050" of travel. Then, look
at the degree wheel and see what it says. If
your cam card says the intake lifter opens .050"
at 25 degrees before top center and you have
a reading of 20 degrees BTC, the camshaft is
opening 5 degrees later (retarded) than the
recommended opening. Depending on where you
want the cam installed either change the position
of the crank gear or whatever other method is
available and degree in the cam again to make
sure. The entire point of doing all of this
is not to dial in the "magic" setting right
off the bat, (unless you are luckier than me)
but instead, now when you run the engine and
it possibly doesn't perform up to your expectations,
you will know where the cam is installed and
be able to make informed adjustments to the
engine. Otherwise, how would you be guaranteed
the cam wasn't installed eight degrees either
way? Boy! Did I promise to be brief somewhere?
Oh well!

|