| 
THE HARDWARE
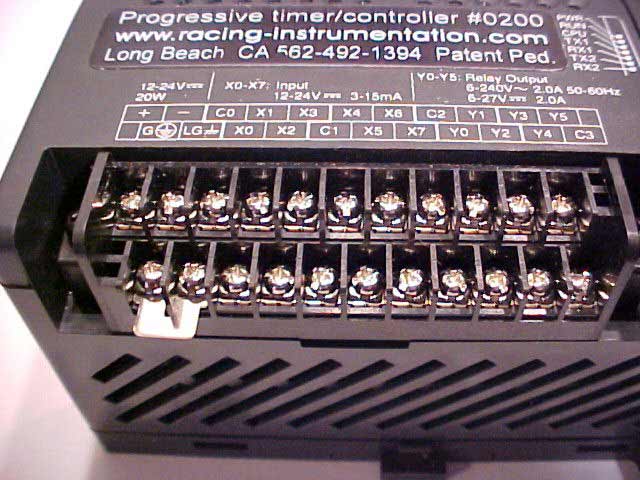
The box is 4.5” x 3” x 2.5” and light weight at 281.2 grams. It is made from some tough, high tech plastic which gave me pause but a couple of drop tests proved otherwise. Yes, you can kill it with a hammer, but it will stand up just fine to everyday normal use.
 The terminal connection section is removable which is nice if you are prone to carrying spares. Instead of having to remove all the wires you just remove 2 screws and plug in the spare controller. If you have two cars you can purchase an extra terminal block and just move the controller from car to car. This removable feature is also a time saver when welding on the car. The terminal connection section is removable which is nice if you are prone to carrying spares. Instead of having to remove all the wires you just remove 2 screws and plug in the spare controller. If you have two cars you can purchase an extra terminal block and just move the controller from car to car. This removable feature is also a time saver when welding on the car.
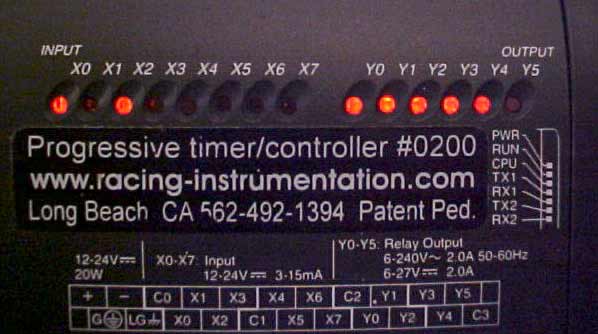
 There is a row of indicator lights that serve to bench test all your connections and your software setup. The left hand section of lights is for the input wiring. As an example, when you push down your throttle switch the XO indicator lights up. Different lights indicate the reset button and/or purge being activated. There is a row of indicator lights that serve to bench test all your connections and your software setup. The left hand section of lights is for the input wiring. As an example, when you push down your throttle switch the XO indicator lights up. Different lights indicate the reset button and/or purge being activated.
The lights on the right will indicate the activation and pulsing of each stage that is preprogrammed. This light array is especially handy for your initial learning curve and
ADVERTISEMENT
 |
verifying that your circuits are all working as planned once you have the procedure down.
On the back is the Off/Run switch. The Term position is ignored for our use. The interface cable plugs into port 2 and is connected to the serial port of your computer. If you have a new computer, it may not have a serial port but does have USB ports. In that situation a serial to USB adapter cable is required. The box requires a 2 amp fuse on the 12 volt input for protection and is included in the complete package. 16 volts systems are good to go also. There are two holes in the base for mounting purposes. You will need relays to fire the solenoids as you cannot direct wire the solenoids to the box.
THE SOFTWARE
The software is an easy installation. No drama here. It will run on any Windows computer with Win98 and up. There are three screens to work with.
 The PC File screen is where you enter your time and progressive preferences. You have many features and choices with this controller which I will list shortly. For now, please note the button choices labeled “Program 1 and 2” in the lower right corner. Once you have entered your preferences you click the “Save to Progressive” button to send the settings to the computer in the PROgressive. You can also write some notes explaining why you used these settings and, more importantly, you can save your settings and notes to a file for future quick changes from day to day or track to track. The PC File screen is where you enter your time and progressive preferences. You have many features and choices with this controller which I will list shortly. For now, please note the button choices labeled “Program 1 and 2” in the lower right corner. Once you have entered your preferences you click the “Save to Progressive” button to send the settings to the computer in the PROgressive. You can also write some notes explaining why you used these settings and, more importantly, you can save your settings and notes to a file for future quick changes from day to day or track to track. |
The “Progressive Data” screen reads the computer in the box itself. This allows you to see what you ran last or verify that you set your current preferences the way you wanted. |
|
The “Charts” screen gives you a visual representation of what your PC File and actual Progressive settings look like compared to each other. |
|

|