Project Muscrate
...bringing up the rear! Part two.
By Jay Roeder
5/22/06
 i everybody and welcome back! Last month I covered the basic plan for “re-tooling” the rear suspension of Project Muscrate and showed the first steps in the process. The new suspension components were procured as a complete “package” from Moroso and Competition Engineering and included new upper and lower control arms, Moroso “Trick” rear coil springs, lower spring pocket reinforcement plates, spherical ball type upper control arm bushings, aluminum bushings for the transmission cross member and the piece de’ résistance, adjustable anti-roll bar.
All of these components I might add are direct bolt-in’s for FOX platform Fords such as Mustangs, Fairmont’s, T-Birds, Capri’s, etc. except the anti-roll bar which does require some fabrication and welding. By the end of this month’s installment all of the shiny new parts will be installed and I hit the track for some testing. As they say, “a picture is worth a thousand words” so I will let some of the photos do the talking.
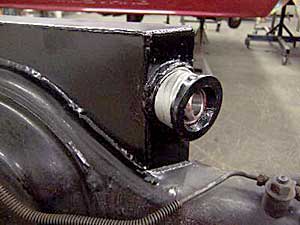 This shows the sperical upper bearing about to be slid into place.Once in it is held with a snap ring. Nice! |
The first project I decided to tackle was the installation of the Competition Engineering spherical bearing type upper control arm bushings part # C3168. In my particular case there were some modifications to the upper ears on the housing required to be able to use these bearings but for “normal” people the process is very straight forward and doesn’t require any special tools.
My deal was because as I stated last month I made everything from scratch 14 years ago and it just wasn’t a “bolt-in” kind of a deal for me. I won’t bore you with all the particulars but let's just say that drilling a 1 7/8” hole through ½” plate steel with a hole saw and a hand drill is not something I would want to do again. For all you lucky saps that already have an 8.8 or 9 in. rear housing with factory type bushings installed, the process is a snap.
Simply remove the previous bushings with an air hammer or a torch and a big hammer or whatever helps you get your aggressions out and the hard part is done.
The new bearings use a aluminum sleeve that has a slight tap fit into the existing bore of the rear end bracket and then is retained by a large snap ring that fits into a groove in the sleeve which prevents it from ever working its way out. I used a small amount of anti-seize paste to make the sleeve slide in a little easier. Once the sleeve is installed the spherical bearing gets slid into the sleeve up against a shoulder and is also retained by a snap ring. That’s it.
You now have completely friction free rear upper control arm bushings!
Continuing on with the upper control arm portion of the project I assembled the tubular control arms, part # C8005, as per the instructions that also utilize spherical bearings on the end of the arm that bolts into the chassis. The arms are adjustable in length which allows you to fine tune the pinion angle and the left to right centering of the housing in the car. It also lends itself to installing a little “pre-load” into the chassis if you desire by lengthening the right side bar until there is some bind present.