|

Installment #6:
We build a transmission
Words and photos by Steve
Oldani
6/6/03
 hope in this article to show more details in
the process of building a Powerglide transmission.
For some other basics, you can refer to my previous
"Trick Tranny Tips" here on DRO. I got a phone
call from my long-time friend, Jok Nicholson,
advising me he and his son were on the way with
a carload of JW Performance transmission parts
for me to assemble for the "Back-2-Basics" Vega
he is currently constructing.
hope in this article to show more details in
the process of building a Powerglide transmission.
For some other basics, you can refer to my previous
"Trick Tranny Tips" here on DRO. I got a phone
call from my long-time friend, Jok Nicholson,
advising me he and his son were on the way with
a carload of JW Performance transmission parts
for me to assemble for the "Back-2-Basics" Vega
he is currently constructing.
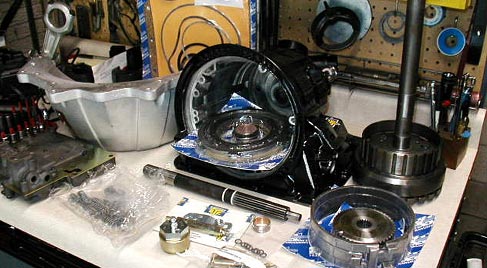
We went over what the goals and intended use for the trans would be, and then set out a plan of attack. I still had the 1.76 gears and 180 of the lovely little needle bearings they require in the box, left over from when I installed the 1.80 straight-cut gearset in the Project 4-link dragster trans some time ago.
 Jok
had all of the needed parts to assemble the
planetary, including the new billet output shaft
carrier, and the pins and lock-plate for them.
I first used Dykem and a punch to set up the
locations to drill and tap the front of the
carrier housing for the three screws which retain
the lock-plate for the aftermarket pins. After
these were done, all parts were washed and,
after a liberal application of gel lube to the
180 needle bearings, the new washers and the
gears were assembled into the carrier. Then,
I added in the bleed holes to the case crescent
area. The reverse piston was installed in the
case, and then the reverse clutch assembly was
put in. Jok
had all of the needed parts to assemble the
planetary, including the new billet output shaft
carrier, and the pins and lock-plate for them.
I first used Dykem and a punch to set up the
locations to drill and tap the front of the
carrier housing for the three screws which retain
the lock-plate for the aftermarket pins. After
these were done, all parts were washed and,
after a liberal application of gel lube to the
180 needle bearings, the new washers and the
gears were assembled into the carrier. Then,
I added in the bleed holes to the case crescent
area. The reverse piston was installed in the
case, and then the reverse clutch assembly was
put in.
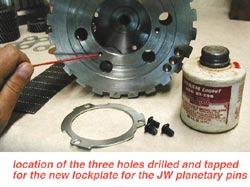
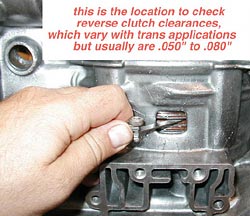 There
is a small "window" under the valve body area
of the case where you can check the reverse
clearances, as shown in the photo. Once this
was checked, then the high gear drum and clutches
were assembled and checked for correct clearances,
as shown in the photo. Then the drum was installed
after placing the Torrington bearing under the
flange gear, on top of the planetary center
gear. The low band was then put in over the
drum, and the dual-ring low gear servo was assembled.
I omit the stock cushion spring and small washer,
and replace them with a washer so there is no
play between the servo piston and the servo
piston shaft. Then, the pump was taken apart
to double check things. There
is a small "window" under the valve body area
of the case where you can check the reverse
clearances, as shown in the photo. Once this
was checked, then the high gear drum and clutches
were assembled and checked for correct clearances,
as shown in the photo. Then the drum was installed
after placing the Torrington bearing under the
flange gear, on top of the planetary center
gear. The low band was then put in over the
drum, and the dual-ring low gear servo was assembled.
I omit the stock cushion spring and small washer,
and replace them with a washer so there is no
play between the servo piston and the servo
piston shaft. Then, the pump was taken apart
to double check things.
NEXT
PAGE >>
|