|
<<
PREVIOUS PAGE
It is always a good idea to disassemble things
even if new, just to confirm they are as they
should be. There are photos showing where the
stock downshift timing valve is located, and
it needs to be removed for race trans applications.
Also, photos show the location of the converter
feed passage, and the pump priming valve roll
pin, which needs to be staked in place, or replaced
with a better pin to secure it in place. I again
apply a good amount of gel lube to the front
pump Teflon sealing rings.
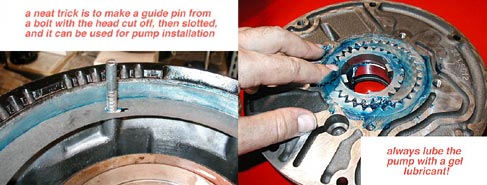
After the pump is ready, I like to use a guide
pin to align the pump gasket and install the
pump with. When using the Ultra-Bell, always
use some RTV sealant under the bolt heads as
it will prevent headaches later! Always use
a torque wrench as well, on ALL fasteners in
a trans. Once the pump was on I used a caliper
to measure the end play, 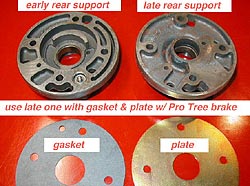 which
can be adjusted with shims at the pump, or under
the rear Torrington bearing at the output shaft.
Then, I installed the late-model rear support,
along with the correct gasket, and plate under
it as well. The photo (right) shows the difference
in the early and the late supports, as well
as the gasket and plate. Use only the late-model
support with the gasket/plate if you are using
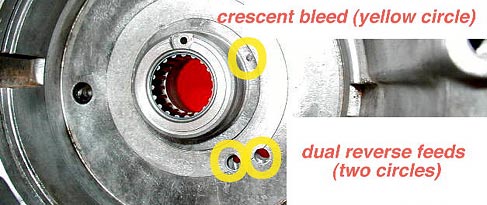
a dual-passage brake. Another photo shows the
inside of the case, and identifies the dual
feeds, and also where the crescent air bleed
comes in to the case, behind the reverse piston. which
can be adjusted with shims at the pump, or under
the rear Torrington bearing at the output shaft.
Then, I installed the late-model rear support,
along with the correct gasket, and plate under
it as well. The photo (right) shows the difference
in the early and the late supports, as well
as the gasket and plate. Use only the late-model
support with the gasket/plate if you are using
a dual-passage brake. Another photo shows the
inside of the case, and identifies the dual
feeds, and also where the crescent air bleed
comes in to the case, behind the reverse piston.
Then, I disassembled the valve body, again
to confirm all was okay, and then installed
it to the case, being sure to line up the tube
from the body to the case, and the shift linkage
pin  into
the manual valve. The photo (left) shows the
orientation of the shifter linkage inside the
trans. After torquing the valve body, the filter
extension and filter were installed, along with
a deep cast-aluminum pan, which holds an additional
two quarts of ATF. into
the manual valve. The photo (left) shows the
orientation of the shifter linkage inside the
trans. After torquing the valve body, the filter
extension and filter were installed, along with
a deep cast-aluminum pan, which holds an additional
two quarts of ATF.
Then, the low band was adjusted. The correct
procedure is to tighten the center bolt in to
72 inch/pounds, then back it out 3 1/2 to 4
turns, and snug the lock nut. At the same time,
I snugged the outer lever on the 2-piece shift
lever. Then, the tailshaft housing was installed.
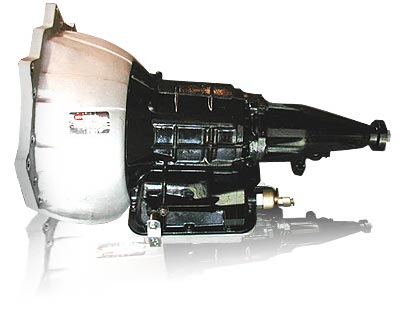
That pretty much wraps up the build of Jok's
1.76 trans, which should be bulletproof for
his Back-2-Basics Vega.
SOURCE BOX:
Oldani Motorsports
328 Drynan Drive
Waterloo, Iowa 50701-1622
oldani@forbin.net
319-233-5677 (8-10 PM Central time)
|