OH, 'CHUTE!
Mounting a parachute on any car is time-consuming
and carries a potential for disaster. You have
to be awfully careful in putting this item on
your door car, dragster or roadster, because
your life is literally in your own hands when
doing so. It has to be done right.
First, some advice about a parachute. No. 1,
don't even think of buying a used one. Again,
it's your life, and how much is it worth? Say,
$50 for a flea market used one, or $300 for
a new, never-used one? My life is worth much
more than that, and I gladly paid the proper
dough for our new Stroud Safety 'chute.
No. 2, follow all instructions that come with
your new parachute. And No. 3, if you're in
doubt, find yourself a friend like we found
in James Webb, a Top Dragster racer from Acworth,
Georgia, who was over at Tommy Harris's FabCon
shop when wife Fran and I were about to mount
our Stroud on the back of my new front-engine
dragster.
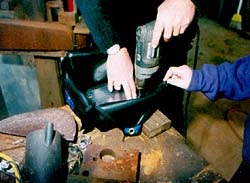 Mounting
the parachute involves drilling four holes into
the small aluminum mounting plate that came
with our Stroud parachute, and Webb showed us
the proper way. First, he found dead center,
penciled it in, then measured from there to
line everything up with the four bolt holes
in the round stock that will serve to hold our
parachute in place on the back of the dragster's
roll cage. Drilling of those four holes through
the aluminum mount was no problem once we determined
exactly where they should go. Mounting
the parachute involves drilling four holes into
the small aluminum mounting plate that came
with our Stroud parachute, and Webb showed us
the proper way. First, he found dead center,
penciled it in, then measured from there to
line everything up with the four bolt holes
in the round stock that will serve to hold our
parachute in place on the back of the dragster's
roll cage. Drilling of those four holes through
the aluminum mount was no problem once we determined
exactly where they should go.
But what about the four holes needed for the
cloth parachute pack itself? Do we use a knife
and dig them out, or use the same drill and
bit for the aluminum holes and drill the pack
with that? Neither, Webb said. Take the parachute
pack, and once you've determined exactly where
the four holes are going in it, place the pack
on a block of wood and drill away. "Drill all
the way through the pack and into the wood,"
Webb said. "That way you won't have any frayed
edges in the chute pack, and it will last nearly
forever." We let him do the drilling on our
Stroud, and the results turned out nice and
safe.
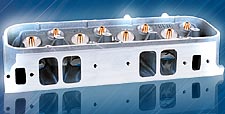
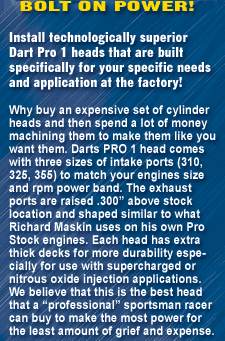
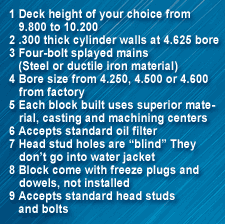
BG'S NEW IDLE-EZE MATCHES
CAM TO CARB
High-performance camshafts and carburetors
sometimes don't get along. Install a high-lift
or long-duration cam in your engine and your
carburetor idle often goes to the dogs, with
engine rpm either way too high for proper starting
line staging or
ADVERTISEMENT
 |
way
too low for driveability. And throttle response?
Forget about it.
Valve overlap is the culprit here. In many
racing cams, intake and exhaust valves are open
simultaneously, and that leads to different
pressures above and below the carburetor butterflies.
The carb's "idle signal" becomes lost, and idling
and responsiveness suffer. The carburetor is
being deprived of engine vacuum, and no amount
of idle screw adjustment can solve that problem.
The solution has often been to drill holes
in the carb's butterflies, which allowed the
natural atmospheric pressure above the butterflies
to effectively solve the problem. But now, you
say, that doesn't seem right. After all, your
argument might go, I just paid "X" number of
dollars for this new carburetor, so why should
I drill a bunch of holes in its bottom when
I haven't even bolted it onto my engine yet?
And how big a hole? And exactly where? Many
a carburetor has been rendered useless by the
wrong size drilling.

|